Homemade Croissants
There’s nothing like the smell of freshly baked homemade croissants in the morning! As a French girl that grew up with croissants from the boulangerie every weekend, and after years of experimentation, I’m happy to share my foolproof, super-detailed recipe for making homemade croissants.

In this article, I’ll take you step-by-step through the preparation of the yeasted puff pastry or pâte levée feuilletée (the basis of the croissants), while sharing my tips and advice for folding and shaping the croissants.

I have tell you right now that this recipe takes two days to prepare. I reassure you, not two days of work, but you will have some rest and chill time to respect and it is recommended to let the dough rest overnight or 24 hours before shaping the croissants. Believe me it is worth it!
What are croissants?
Croissants is a classic French pastry made principally of flour, butter and yeast.
The croissant recipe is one of the most challenging recipe in baking, but once you master it, you can create so many of variations and a whole world opens to you!
My 3 tips during the whole process
- PRECISION: Be precise and try to work geometrically with nice rectangle or triangle shapes. Don’t hesitate to cut the dough a little to get your dough back in the right shape.
- TEMPERATURE: Your dough must be cold each time your work with it, that’s why I always mentions to place it back in the fridge or sometimes in the freezer to save some time. You don’t want the dough to be frozen, just really cold. If you dough is too warm the butter will melt and the dough will start to rise uncontrollably.
- BE GENTLE: When you will roll your dough, always do it gently. You don’t want to butter to incorporate to the dough (except at the beginning of the process) but you want to create layers that will make beautiful flaky croissants. Always press the dough gently and extend it but don’t push it too hard.


Ingredients list
To make homemade croissants, you don’t need much ingredients, however, it is important to choose them well.
- Flour: Ideally, a mix of all-purpose flour and a bread flour, rich un gluten such as T45 flour. If you only have all purpose wheat flour, that will work too!
- Dry yeast: I use active dry yeast that comes in a little. You don’t need to activate it before using it.
- Sugar: I use white sugar.
- Salt: I use fine table salt.
- Water: You must use cold or room temperature water.
- Milk: I recommend whole milk (3.5% fat). You must use cold milk.
- Butter: This is of course the most important ingredient in this recipe. I recommend a French or at least European unsalted butter, with a minimum fat content of 82%. Your butter must be cold and not soft! This is very important to be able to work the dough better.
How to make homemade croissants?
Making homemade croissants consists of four steps:

Day 1
The détrempe
- 500 g flour
- 7 g dry yeast
- 60 g sugar
- 10 g salt
- 140 g cold milk
- 140 g cold water
- 50 g butter, cold, cut into cubes
The détrempe is the basis of the croissant dough. It is simply a dough made of flour, water and/or milk, sugar and salt and, above all, dry yeast to make the dough rise.
Depending on the recipe, butter can be added to the détrempe but some recipes do not add it. I find that the butter in the détrempe makes the dough even softer and easier to work with.
To make the détrempe, mix the dry ingredients (flour, dry yeast, salt and sugar) well. Then pour in the water and cold milk. Knead everything well in your kitchen machine using the dough hook attachment for 5 minutes at low speed.
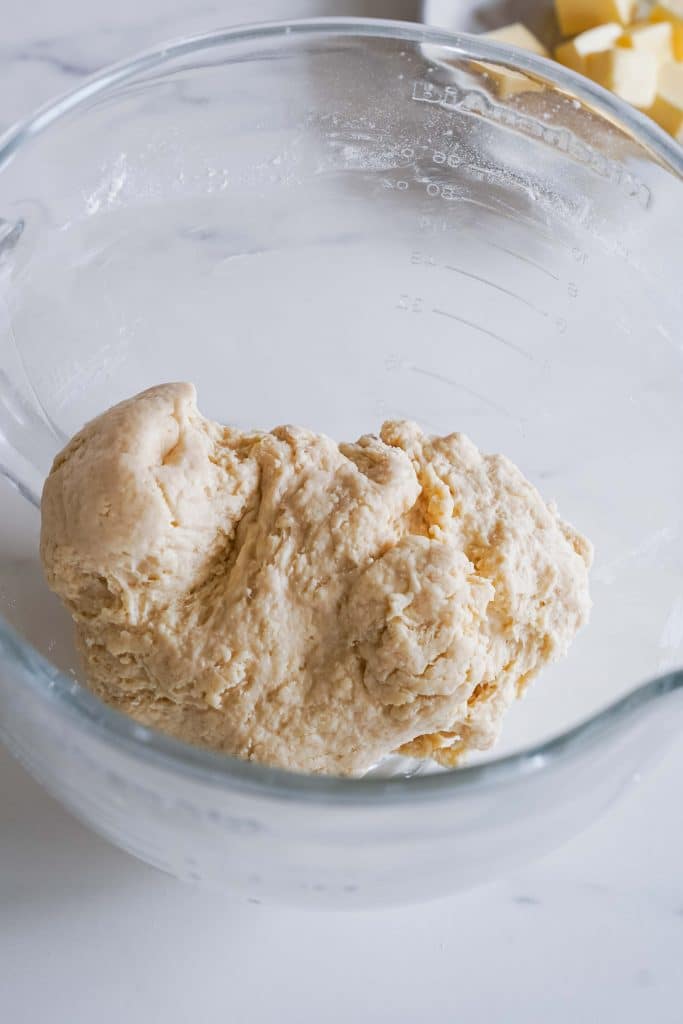
The dough will certainly look a bit dry, it’s normal that it still lacks butter. Let the dough rest for 10 minutes so that the flour absorbs the liquids.

Then add the butter cubes to the dough and knead again for 5 minutes on low to medium speed.
The butter should be completely incorporated and the dough should be homogeneous and smooth.
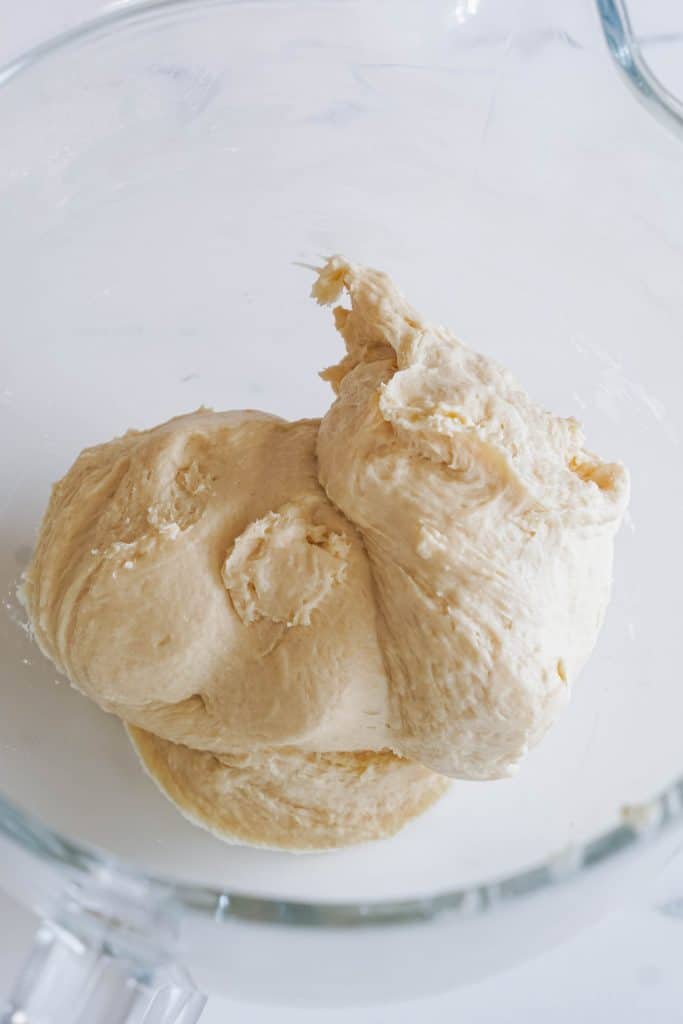
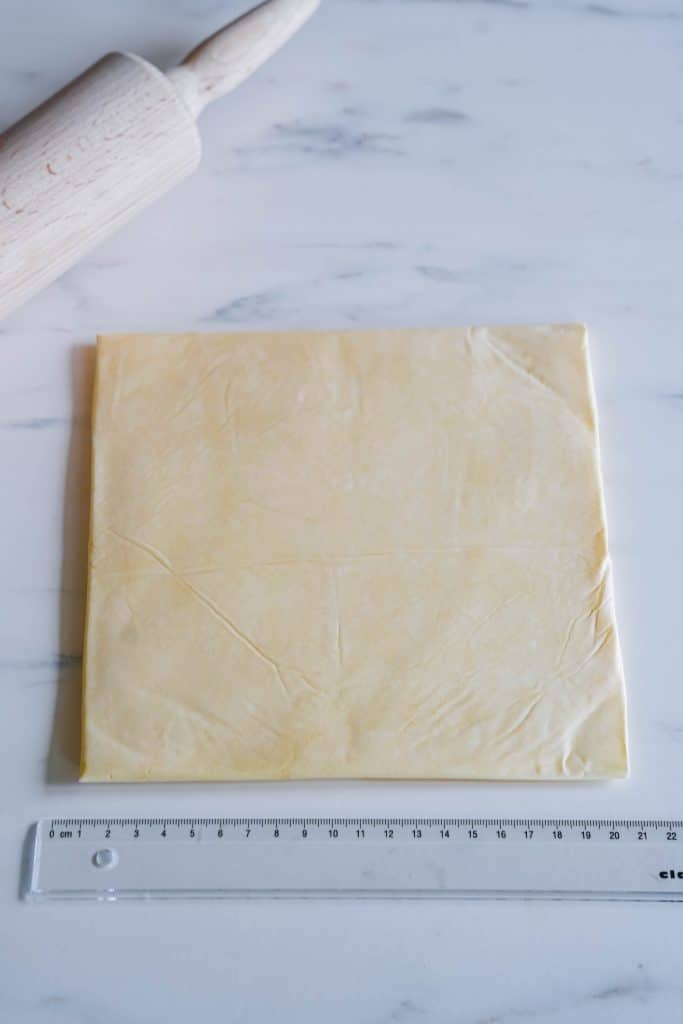
Take the dough out of your bowl, flour your work surface and form a nice ball of dough.
I advise you to make a cross on the dough so that you can roll it out into a rectangle later on more easily.
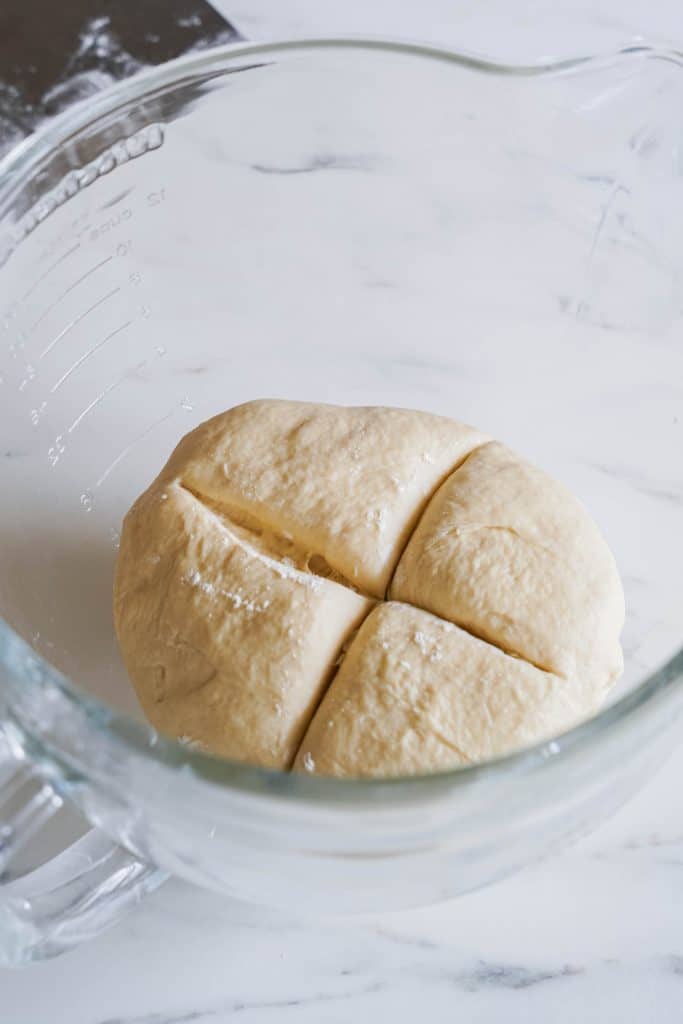
Put your dough back in a bowl, cover with a clean cloth and let it rise for at least 1 to 2 hours in a slightly warm place, like near a radiator.
Then, chill for 30 minutes in the fridge so that the dough is cold before adding the butter.
The tourage
Prepare the beurre de tourage
While your dough rests, you can prepare your beurre de tourage a flat square of butter about 20 cm by 20 cm (8 x 8 inches).
To do this, cut your cold butter block into cubes. Place the cubes on a piece of parchment paper so that they form about a square.
Fold the parchment paper over the butter so that the sides are 20 cm long.
Then tap the cold butter with a rolling pin to soften it slightly and finally spread the butter with the rolling pin so that it spreads well in the parchment paper pocket.
Keep the butter in your fridge until needed.
Incorporate the butter
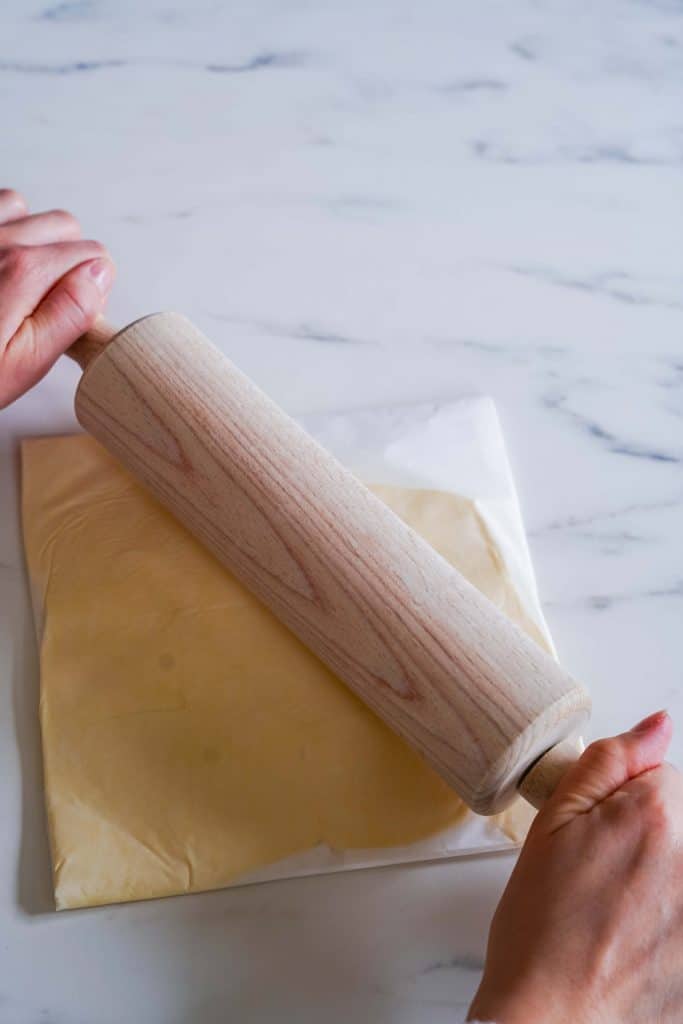
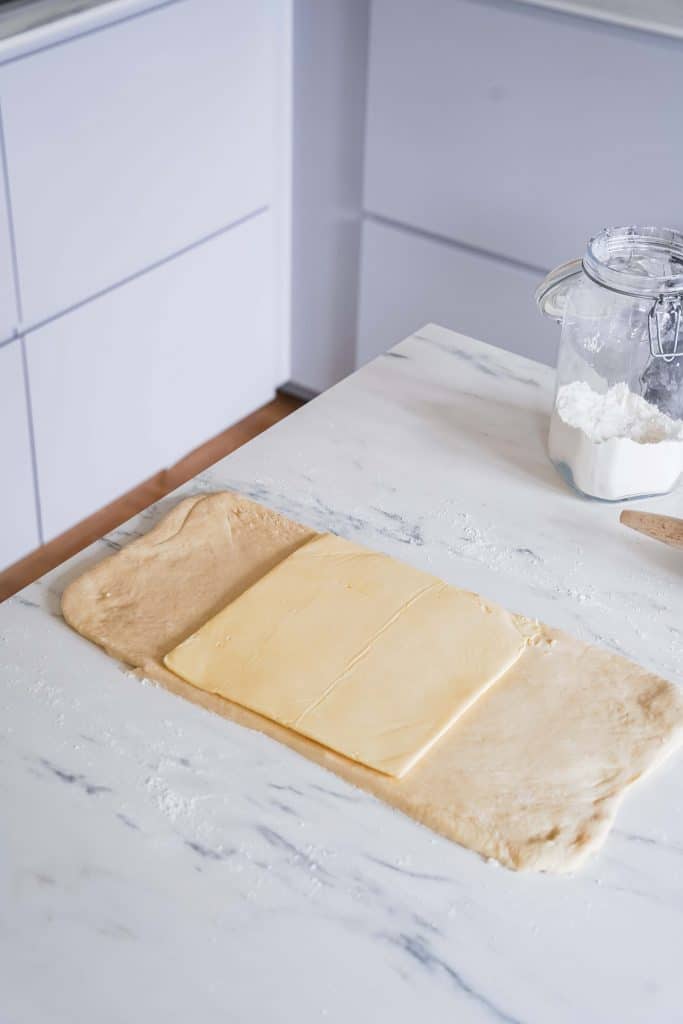
Once the détrempe has double in size and cooled again, place it on your lightly floured surface. Roll it out gently to form a rectangle of about 40x 20 cm (16 x 8 inches).
Place the flat butter in the center of the dough. Fold the edges of the dough inward to completely cover the butter.


Then roll the dough to flatten it gently. Turn a quarter turn and roll out the dough to form a rectangle again, about 40x 20 cm (16 x 8 inches).
If your dough is too warm, you can let it cool off 15 minutes in the freezer covered with a plastic wrap. This step is optional ans really depends on your dough at this stage.
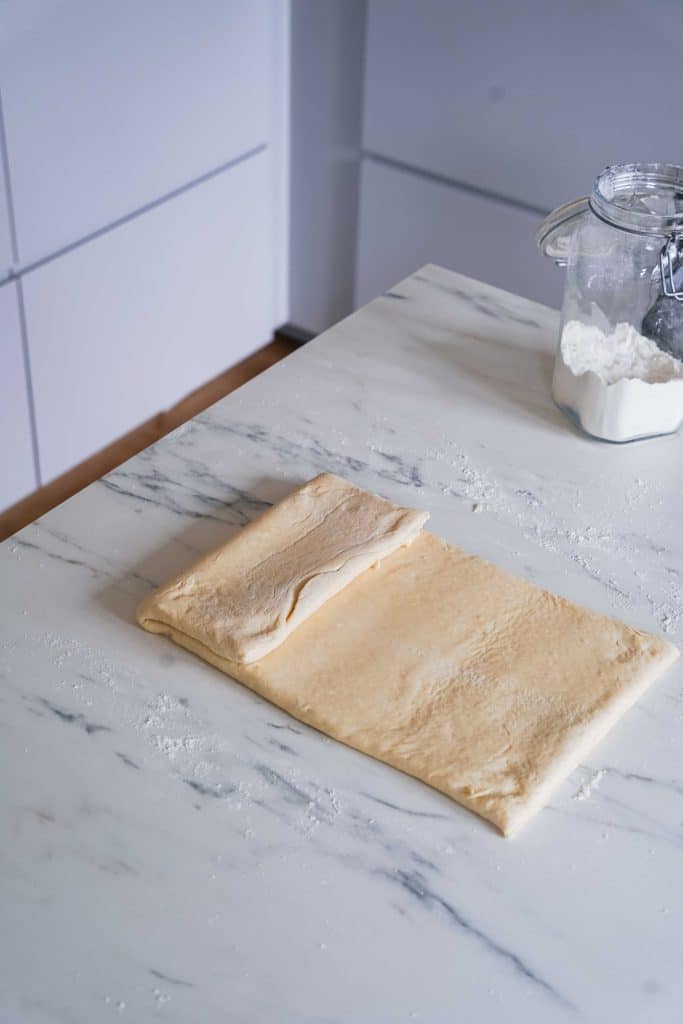
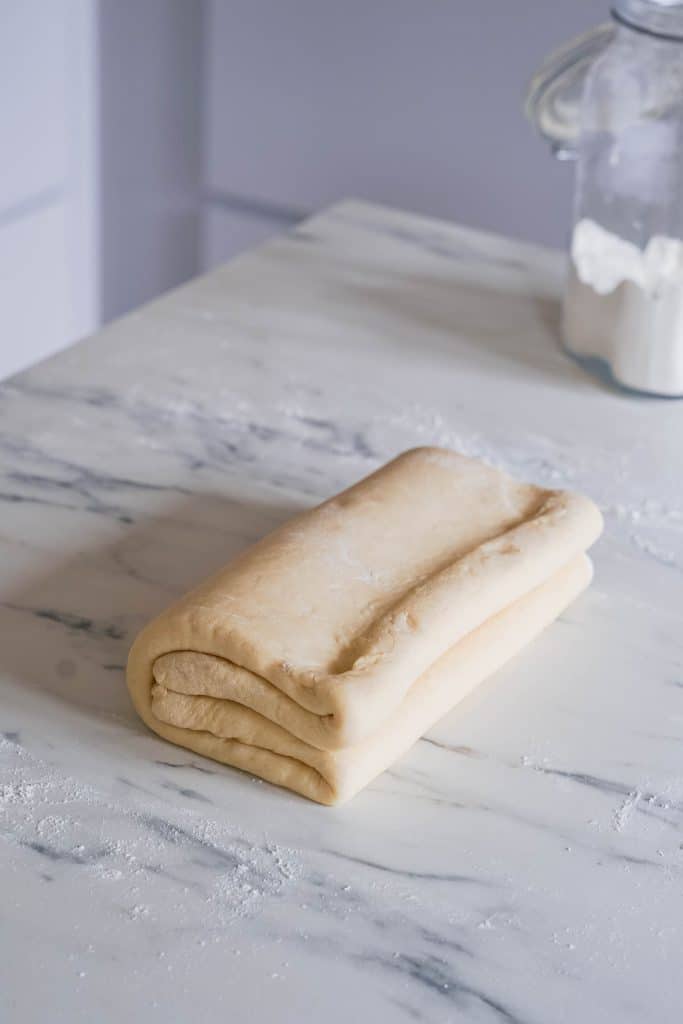
1st fold
For the first round of tourage is a double fold or book fold. Fold 1/4 of the dough to the middle and fold the other edge, then fold the whole in half.

Turn the dough a quarter of the way and roll out the dough gently in the length. Place the dough in cling film or a plastic wrap and let it rest for 15 minutes in the freezer (30 minutes in the refrigerator).


2nd fold
For the second round of tourage is a single fold or letter fold. Roll out the dough slightly. Fold in 1/3 of the dough and the other third on top.

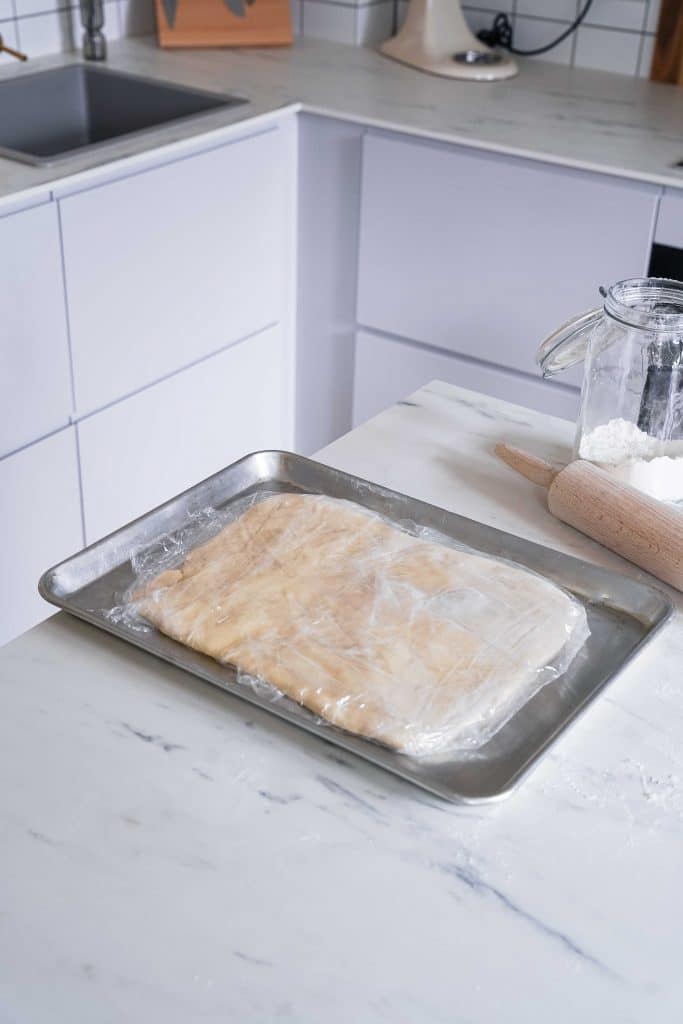
Turn the dough a quarter and roll out the dough gently. Form a rectangle of about 40x 20 cm (16 x 8 inches) again to pre-shape your dough for the following day.


Wrap the dough in cling film, place on a baking tray to keep to flat and let the dough rest in the refrigerator for one night to 24 hours.
Day 2
Cutting and shaping
Create warm and humid environment
I saw this tips on YouTube and it worked so well that I had to include it in my recipe! To let your croissants rise before baking them, you need a warm and humid environment.
The best way to do it is to bring about one liter of water to a boil in a skillet. Place the skillet with the hot water in your oven and close the oven until you need it. Your oven should be turned off and let the evaporation of water warm up your oven.
NOTE: Some of my readers had the issue that the butter was leaking from the dough during the rising process. It’s probably because the oven was too hot. The oven temperature should be between 27-30°C (80-86°F). If you oven is too hot, open the door and let some fresh air in.

Cut and shape
Remove the dough from the fridge. Flour your work surface slightly and gently roll out your dough with a rolling pin. Form the dough into a long rectangle as straight as possible.
To obtain regular croissants, I advise you to adjust them slightly by cutting the excess dough if necessary.
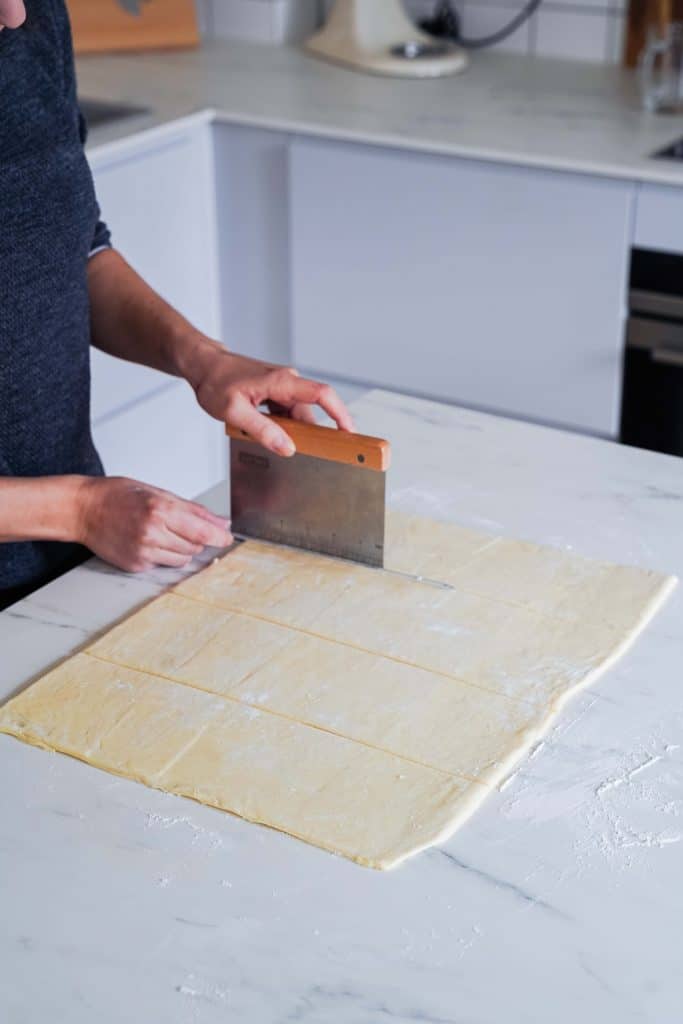
Then, cut 4 big bands in the direction of the width using a pizza cutter or a dough cutter.
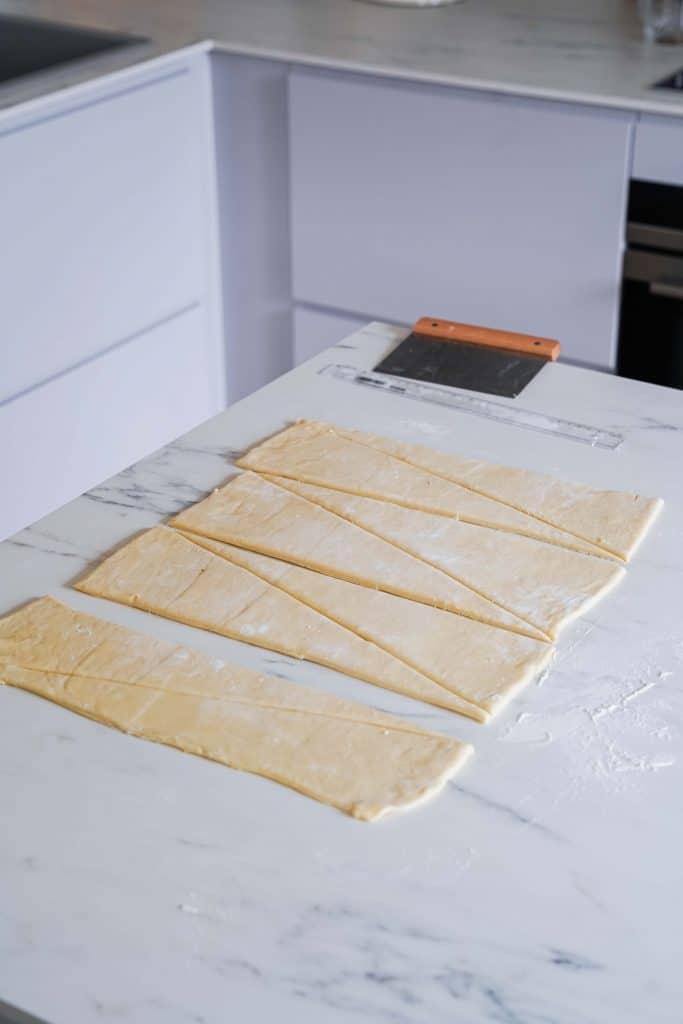
Cut these bands in half on the diagonal to obtain isosceles triangles (triangles with a right angle). Readjust the triangles to make it straighter with your hands.
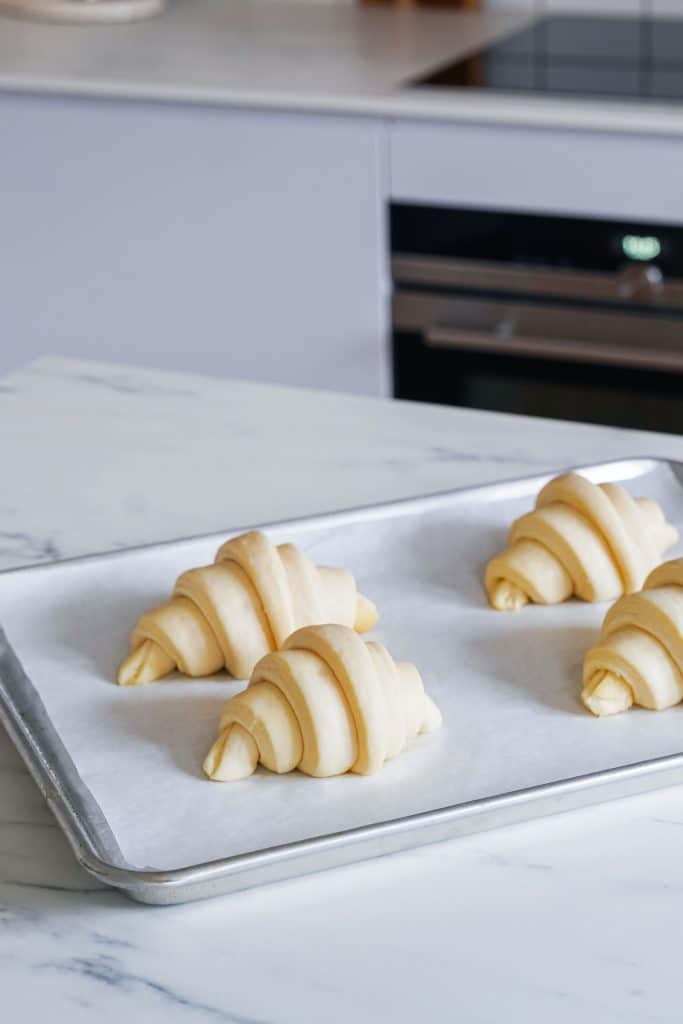
Then, roll the dough from the wide end to the point to get a nice crescent shape. The point should be under the croissant so that it stays closed after baking.

Freeze your croissants (optional)
If you want to freeze some of the croissants, this is the time to put them in a bag and place them as is in the freezer. Make sure they don’t touch each other. I like to freeze them two by two.
Once you want to bake them, remove them from the freezer the day before and place them in the refrigerator. Then, place your croissants in your warm and humid oven (see above) and resume the recipe at that point.

Bake
Final rise
Place the croissants on a baking tray lined with parchment paper and let them rise for 1.5 to 2 hours in your warm and humid oven (see above).
Once the croissants have expanded size, take them out of the oven. Preheat the oven to 180 °C (350 °F, convection oven) and remove the skillet with the hot water from the oven.
Egg wash
For the egg wash, mix an egg yolk with a little milk.
Brush the croissants very delicately with pastry brush to avoid damaging them as they are really fragile at this point. I also advise you to brush only the top part and not the layers directly.

Bake
Bake for 15-20 minutes until golden brown.
Note
This recipe is made for 8 croissants. Usually, I bake 4 croissants and freeze the remaining 4 croissants for later.
You could also directly prepared two batches (preferably separated in two doughs and not one big dough otherwise, it might be difficult to handle it) and you can have croissants in your freezer each time you need them.
More French breakfast recipes
- Almond Milk Crepes (Dairy Free)
- French Galette des Rois
- Brioche French Toast
- Strawberry Tartelettes with Crème Pâtissière
- Traditional French Madeleines
Don’t hesitate to leave me a comment, it always makes me happy!

You can also find me on Instagram, Facebook and TikTok to see behind the scenes of my blog
Homemade Croissants
Click on the stars to rate!

Ingredients
Détrempe
- 500 g flour
- 7 g dry yeast
- 60 g sugar
- 10 g salt
- 140 g water cold
- 140 g milk cold
- 50 g butter
Tourage
- 250 g butter cold
Egg wash
- 1 egg yolk
- 30 ml milk
Instructions
DAY 1
The détrempe
- Mix the dry ingredients (flour, dry yeast, salt and sugar) well. Then pour in the water and cold milk. Knead everything well in your kitchen machine using the dough hook attachment for 5 minutes at low speed.
- Let the dough rest for 10 minutes so that the flour absorbs the liquids.
- Then add the butter cubes to the dough and knead again for 5 minutes on low to medium speed.
- Take the dough out of your bowl, flour your work surface and form a nice ball of dough.
- Put your dough back in a bowl, cover with a clean cloth and let it rise for at least 1 to 2 hours in a slightly warm place, like near a radiator.
- Then, chill for 30 minutes in the fridge so that the dough is cold before adding the butter.
The tourage
Prepare the beurre de tourage
- Cut your cold butter block into cubes. Place the cubes on a piece of parchment paper so that they form about a square.
- Fold the parchment paper over the butter so that the sides are 20 cm long.
- Then tap the cold butter with a rolling pin to soften it slightly and finally spread the butter with the rolling pin so that it spreads well in the parchment paper pocket.
- Keep the butter in your fridge until needed.
Incorporate the butter
- Once the détrempe has double in size and cooled again, place it on your lightly floured surface. Roll it out gently to form a rectangle of about 40x 20 cm (16 x 8 inches).
- Place the flat butter in the center of the dough. Fold the edges of the dough inward to completely cover the butter.
- Then roll the dough to flatten it gently. Turn a quarter turn and roll out the dough to form a rectangle again, about 40x 20 cm (16 x 8 inches).
- If your dough is too warm, you can let it cool off 15 minutes in the freezer covered with a plastic wrap. This step is optional ans really depends on your dough at this stage.
1st fold
- Fold 1/4 of the dough to the middle and fold the other edge, then fold the whole in half.
- Turn the dough a quarter of the way and roll out the dough gently in the length. Place the dough in cling film or a plastic wrap and let it rest for 15 minutes in the freezer (30 minutes in the refrigerator).
2nd fold
- Roll out the dough slightly. Fold in 1/3 of the dough and the other third on top.
- Turn the dough a quarter and roll out the dough gently. Form a rectangle of about 40x 20 cm (16 x 8 inches) again to pre-shape your dough for the following day.
- Wrap the dough in cling film, place on a baking tray to keep to flat and let the dough rest in the refrigerator for one night to 24 hours.
DAY 2
Create warm and humid environment
- To let your croissants rise before baking them, you need a warm and humid environment.
- The best way to do it is to bring about one liter of water to a boil in a skillet. Place the skillet with the hot water in your oven and close the oven until you need it. Your oven should be turned off and let the evaporation of water warm up your oven.
Cut and shape
- Remove the dough from the fridge. Flour your work surface slightly and gently roll out your dough with a rolling pin. Form the dough into a long rectangle as straight as possible.
- Then, cut 4 big bands in the direction of the width using a pizza cutter or a dough cutter.
- Cut these bands in half on the diagonal to obtain isosceles triangles (triangles with a right angle). Readjust the triangles to make it straighter with your hands.
- Then, roll the dough from the wide end to the point to get a nice crescent shape. The point should be under the croissant so that it stays closed after baking.
Freeze your croissants (optional)
- If you want to freeze some of the croissants, this is the time to put them in a bag and place them as is in the freezer. Make sure they don’t touch each other. I like to freeze them two by two.
- Once you want to bake them, remove them from the freezer the day before and place them in the refrigerator. Then, place your croissants in your warm and humid oven (see above) and resume the recipe at that point.
Final rise
- Place the croissants on a baking tray lined with parchment paper and let them rise for 1.5 to 2 hours in your warm and humid oven (see above). The oven temperature should be between 27-30°C (80-86°F).
- Once the croissants have expanded size, take them out of the oven. Preheat the oven to 180 °C (350 °F, convection oven).
Egg wash
- For the egg wash, mix an egg yolk with a little milk.
- Brush the croissants very delicately with pastry brush to avoid damaging them as they are really fragile at this point. I also advise you to brush only the top part and not the layers directly.
Bake
- Bake for 15-20 minutes until golden brown.